

Why Backend Automated Testing ?
"Automated Testing 101: Understanding the Importance for Your Next Project"


Automated testing is an essential part of software development, and it is especially important for the backend of web applications.
The backend of a web application is responsible for handling the server-side logic and database interactions. This includes handling incoming requests from the frontend, processing data, and returning responses. With so many moving parts, it is crucial to have a robust testing strategy in place to ensure that the backend is functioning correctly.
One of the biggest benefits of automated testing is that it allows developers to catch bugs and issues early on in the development process. By running tests on the backend code, developers can quickly identify any problems and fix them before they become bigger issues. This saves time and money in the long run, as it is much more cost effective to fix a bug early on in the development process than to fix it later on.
Let's build a basic application utilizing a moderately complicated API to demonstrate the concept of testing.
We are proud to introduce Joel's Coffee Shop, a popular establishment located in Ibadan. To show appreciation for our loyal customers, we offer a meal plan that can be purchased for either 3 meals or 2 meals for 12 months.
The cost of the meal plan per year is as follows:
$1080 for the 3-meal plan
$720 for the 2-meal plan
Customers have the option to pay half the price upfront and complete the remaining payment before the 6th month of their subscription.
Once a customer has subscribed to our special coffee plan, the following benefits will be immediately available:
The customer will be credited a specific amount on their cafeteria app:
$90 per month for the 2-meal plan
$60 per month for the 3-meal plan
This credit is expected to be used within the next 30 days
How The Application Works
The customer can use the app to place an order at the café, ensuring timely service due to their loyalty status
Each purchase will automatically deduct the corresponding amount from the customer's app wallet
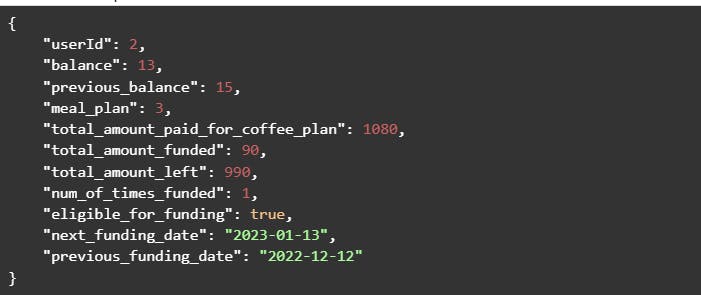
For example, if a customer subscribes to the 3-meal plan, at the beginning of the month, they will have a total of $90 on their Joel's Coffee App. If they visit the coffee shop and purchase a $1 coffee, their app balance will automatically be updated to $89.
If during the month, the customer does not make any additional purchases, on the 30th day, they will see a total of $101 on their app. This is because they will be credited $90 for the next 30 days and will have a remaining balance of $11 from the previous month.
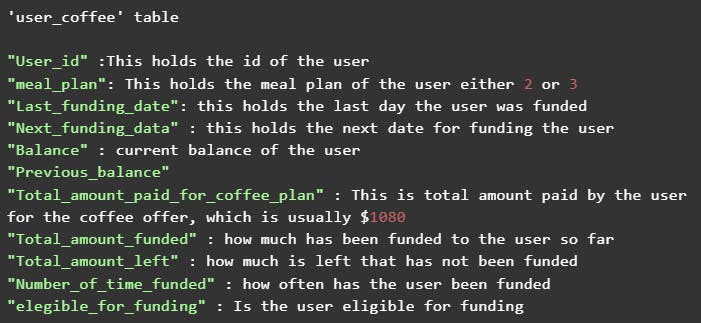
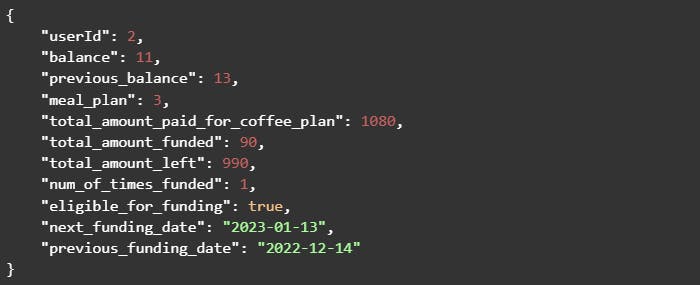
To better understand this scenario, we have also included a sample of our database, including the 'users' table and the 'user_coffee' table
Sample Database

Creation of APIs
Several APIs will make the app work but we will only highlight 2 which are the most important.
1. API for buying Coffee at the coffee shop
In this API we are making 2 important updates and I will explain them below using a sample user in our sample database
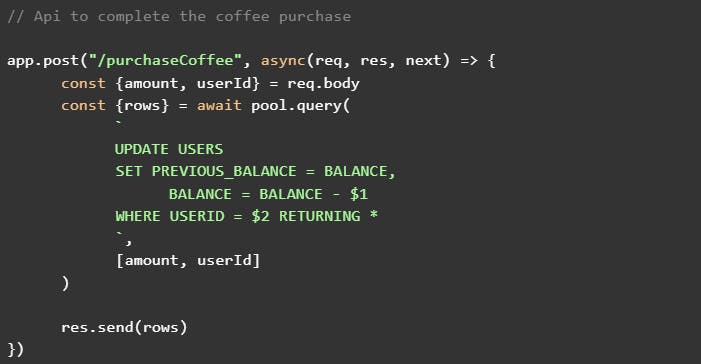
Let's dive into the Updates
Let us assume that the user wants to purchase coffee of $2
We will set the “previous_balance” to the current balance.
We will reduce the current balance by 2
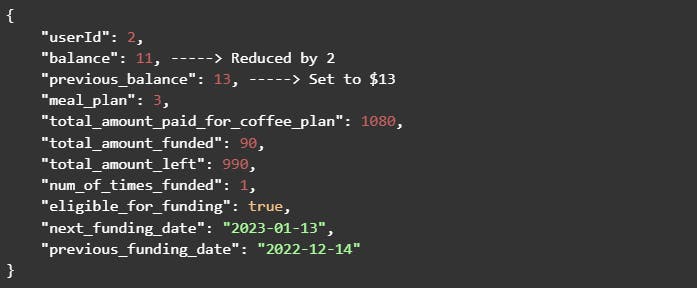
With these 2 updates, our database will look like this
Result
We will then go to the next API
2. API for Funding All eligible customers for a particular day
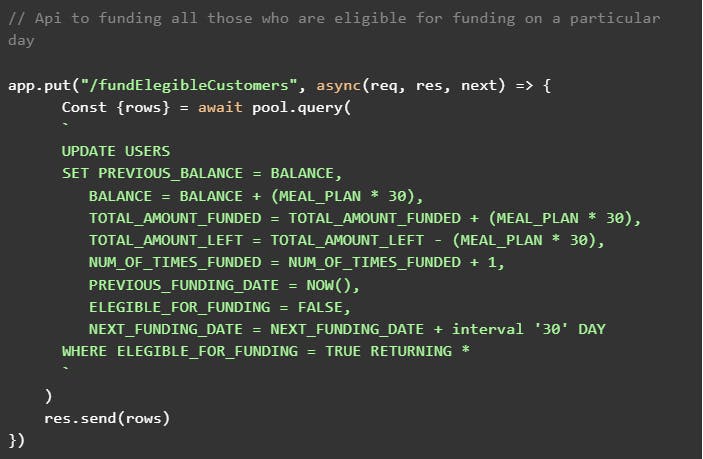
In this API we are making 9 important updates and I will explain them below using a sample user in our sample database
We are setting the previous balance of each user to the current balance
We are increasing the balance of each user by their meal plan. If it is a 3 meal plan then it will be by (3*30) which is $90 and it will be $60 if it is a 2 meal plan.
Also, we will increase how much a user has been funded by the meal plan (3*30) or (2*30)
We will reduce the total amount left by the meal plan either by $90 or $60
We will increase the number of times funded by 1
We will ensure that the user is not eligible for funding till the next 30 days by changing the field “eligible_for_funding” to false
We will be resetting the previous funding day to today
We will then set the next funding date to 30 days from today
We will ensure we are only updating those who are eligible for funding
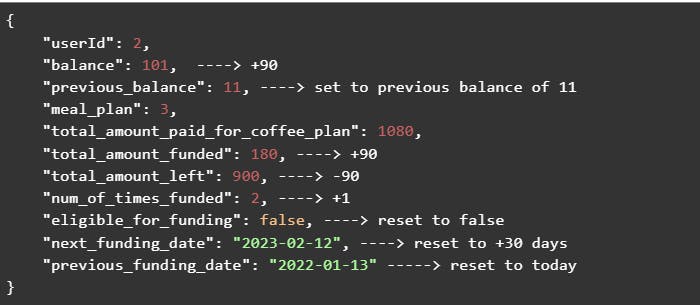
After this update, we will have our sample database as this
Result
Why Automated Testing
As our application is in production, it is expected that we will make changes over time. As the codebase grows, it can become difficult to keep track of updates made to the funding API. For example, if changes are made to the application after three months and it affects the funding API, and the code is pushed to production, users may report discrepancies in their balances and become furious. The project manager may also contact you and ask questions, leading to the realization that the change made had something to do with the balance and "amount_funded" field, which caused the funding API to only carry 7 out of 9 updates.
Automated testing is a way to use code to test other code and ensure that it matches the expected results. In our scenario, if automated testing was used, the code would not have passed all 9 tests before it was pushed to production, preventing the issues with the funding API. By using automated testing, we can chain all of our expected outputs for each API, ensuring that our working code does not break each time we make an update.
In conclusion, backend automated testing is an essential part of software development, and it is especially important for web applications. It allows developers to catch bugs and issues early on, saving time and money in the long run. By implementing automated testing in your development workflow, you can ensure that your backend is functioning correctly and make changes to the codebase with confidence.
PS:
If you would like me to create a series on how to perform automated testing in Node.js, please leave a comment below. I will create a sample project and provide an in-depth explanation